miércoles, 27 de abril de 2016

Rubrics rubrics and rubrics!

Good morning teachers!

On this post I want to show you the results of our new challenge: our own E-Project's rubric.


As you know, in order to develop our assignments correctly, we must take into account our teacher's rubric in order to know what is she going to evaluate. In that way, we are able to be aware of our faults and successes once she has corrected, and improve it, if needed. This means, a rubric gathers all the features needed in order to have a good mark.


Well, this time our challenge is to make a rubric like this one ourselves. For me it is a very good idea to do this, since it gives us the opportunity to show what is really important for us when accomplishing our tasks and think about how would we evaluate it if we were the teachers.


Well, to make it I used an online tool called QuickRubric. It is a very simple tool which allows you to make rubrics as big as you wish: within the chart, you can include as many columns as rows as you want, a title, a subtitle and the punctuation you will use to assess. 

QuickRubric is very easy to use: you just have to sign up, and start working. It is not needed to watch any tutorials or read any instructions to use it, since it is very clear how it works from the beginning. Once you sign up, you can see a chart with different sections: the title, the raws and the columns. In each of them you can see the words “edit me”, and you just have to click on them to write anything you want.


Once you have your rubric finished, you just have to click on "save rubric" and that’s it! Very easy and fast, and the results are great! I’m sure this will be a very useful tool for my future as a teacher.


While making the rubric, it was a little difficult for me to decide what to assessment aspects to include on it, because I had to think about what is really important for me when evaluating an E-Project. Finally, I chose the ones you can see below, because they fitted the most with my assessment criteria.

Describing each rating scale was a bit difficult too, because (at least in my case) you have to imagine an E-Project for each of them, so you get an idea of how would be an E-Project that is worthy to obtain the maximum rate and how would be the opposite. 

After several attempts and lots of changes, I had my rubric finished. Here you can see it in detail:


lunes, 25 de abril de 2016

Exploring Aurasma!

Hello Teachers!

As you all know, our new challenge for our ICT class is to create an Aurasma picture about your self-portrait as a reader, in order to celebrate the "World book and copyright Day", and I wanted to share with you how was my process while doing it. It was long and hard, so... Are you ready??

First of all, it was difficult for me to understand what this App consisted on, so I searched a tutorial on internet to be clear about it. Here you have it, in case you want to have a look at it:


Once that was clear, I had to understand how to use it. Although in my moodle's assignment was very clear, my classmates told me to watch this useful tutorial they did themselves:


Once I understood everything, I started to work on it. 

First of all, I had to design my Cover image that Aurasma has to scan in order to watch the video, so I decided to use one of my favorite tools:


Before understanding what Aurasma consisted on, I created a really big poster about my book preferences and all the kinds of books I have read during all my life. It was so big that Aurasma wasn't going to be able to scan itso I had to start again, and do something simpler. I decided just to made something that summarized what I wanted to speak about, and represent it through images. Here you have the final result:


Once I finished the first part, I had to prepare the video clip/audio track.

As I didn't want to appear on it, I decided to record my voice with an App called Simple Recorder. Once the result was exactly as I wanted it (this took me several attempts), I tried to mix the cover image with my audio in Aurasma. But I realized that a video was required to obtain the desired effect.
I tried to convert the audio into video, but I still needed to have both of them, so I didn't have any more options.
This was nothing compared to all the issues I had to deal with after that. I made a video using Kizoa, as some of my mates did, but this tool don't allow you to download it on your computer without paying, so one of my friends suggested me to uploaded on youtube to download it later. 
Well, I tried it. But it was difficult to find a web page that allowed me to do it without having to install any program. So I finally gave up when my dad (who is a very clever informatic) told me to use iMovie (which I had already intalled on my Mac)... And SURPRISE! It was easy, fast and offered more resources than Kizoa.

I must confess that I made two Attempts before succeeding on uploading it to Aurasma, due to the size of the video... I thought this was never going to finish.


I felt really silly after all my efforts to download my own video, and all the time I waisted on trying it, but finally I got it!

Once it was uploaded, it was very easy to have my Aurasma finished. It was just upload my Trigger Image, then my Overlay (video clip) and MAGIC! It was finally done. Do you want to try it?  Here you have it! Follow me there, you can find me as Gabrielamqz!


I hope you like it!! See you soon!


lunes, 18 de abril de 2016

Throwback to comics!

Good afternoon everyone!

Remember the post about creating a script for our video in the form of a comic?? Well, this would be a great idea to develop in class with our students, of course, using a web tool. 


So we have developed a slideshow in order to teach them how to do it through Pixton, a fantastic online web.


Thinking of explaining our students in a brief, clear and easy way how to use Pixton, we have picked Google Slides to do it. Pixton is an easy tool to use but it has many different options and could be hard to start working with it for students in early primary. As a result, we have created a slide show with all the main different steps to create properly a comic. 
We have chosen Google Slide to create our slideshow because it is an easy tool really similar to Power Point that we all manage perfectly; and also because it lets us work together being each one on its own home. So that, we save time and we can work coordinated as a perfect team. 
The structure of the slideshow follows the correct order of the different steps to use Pixton. It starts showing how to sign up and create a new account and finishes showing how to complete a comic. To make it more visual, we have done screenshots of the different steps and emphasize it with red arrows and squares. The unique problem we have struggled with has been precisely emphasizing those buttons or elements essential to use Pixton. Google Slides does not allow you to create a red line square; you can just create a filled square. So that, you must create each read line independently and it is difficult to make them perfectly straight. 
In spite of this fact, Google Slides is a great tool in order to teamwork online and create any sort of presentation. In the same way, Pixton is and incredible tool for students to create any story and also represent a specific historical period.

Here you have the link:

Comic Slideshow


Hope you like it! 


Back to the childhood!

Hi again teachers!

I just wanted to show another work we did in the same group I told you some posts ago. This time it is an Infographic. It consists on doing something similar to a poster for the wall, but online. It is aimed to show the students how to do something. In our case, as our topic was History, we wanted to show them how to make a timeline, in order to organize their study. 


 We  were inspirated on Mario Bros videogames, due to the fact that it will make the information visual and funny for children, so they feel more motivaste o do their task. 
At the beginning we tried different kinds of programas but we decided to use Piktochart because it was the more suitable for use. It allows you to use all the space you need for your infographic, as well as all the icons and images in the app. By the way, the backgrounds are amazing and the text edition possibilities too. And it's all free!
Hope you like it and find it useful.  


Some chocolate?

Let's go to the Cinema!

Hello Everyone!

This last week we have been working on a very fun and interesting project: a Video Challenge! Do you remember my CLIL E-Project? Well, according to that, we formed groups made of people who had worked on the same topic (in our case it was History) and started our challenge. 

As films on cinema, first of all, it was essential to write a script. But we did it in a very special way.

Our Video Planning is about how to make a comic. As our Project is about history, we decided to link the comic to that topic. On it, we included some scenes about different periods, in order to teach the students how to do the story. So, by reading a comic, they will learn how to do it. 

To make our Video Planning we used Storyboard That, which is a very useful and simple tool to make comics. It offers a big amount of free resources for you to develop your ideas and create stories related to any topic you wish. On it, we found sketches of places, characters and different types of accessories you can use to decorate your scenes. 

As our story includes those different periods of History, we needed to use very diverse landscapes and characters in order to represent them. During the process we found loads of options to create our comic, even finding inspiring ideas within the tool to carry it out. Although we thought it would be difficult to find all the tools we required, it was easier than we expected.

Also, creating and decorating the sketches and the characters was easy to do, as well as sequencing the images, writing the bubbles and organizing the story. We just had to drag with the mouse what we wanted to use and release it wherever we liked.

Although all this is available, there was one thing that wasn’t. The only problem we found was that to use more than six boxes implied paying, and this limited our work too much. We had to cut back the story in order to make it shorter and use only those six boxes, so we couldn’t include many details we’d liked to. It would have been really nice to be able to do it just as we had prepared it. 

Apart from that, a little detail that was an obstacle too, was the fact that the characters have only two positions (standing and sitting), and sometimes we couldn’t represent the scene exactly as we’d thought. 

Nevertheless, it has been a good idea to use this tool and we are satisfied with the results. We will use it again in the future for other projects, that’s for sure.


Here you have the link to see it in detail:
         Comic

As I told you, that was only the first step! After finishing our funny script, we had to take the most important step: bring it to life!
So after some obstacles and inconvenients, our video challenge was ready. We decided to use a croma key to add some after effects to our video, as for changing the background to pretend different times in history. Moreover, we had to disguise ourself with different clothes. 
"https://www.youtube.com/embed/d5nF30H9Vy4 Recording was easy and we spend about an hour or so to do it (thanks to the storyboard planning) but we had to deal with a lot of problems when editing. 
At the very beggining, we tried Sony Vegas but it didn't work in my computer, so we decided to download a free trial version of Adobe Premier cc, which is a profesional video editor and this meant it was going to be more difficult to use. We had to saw many tutorials before finding out how to use it and how to apply a croma effect. Then, we discovered that the light used in the video was not uniforme as well as the green color on the croma key. This means a VERY BIG trouble  when you are editing because you need the green color to be uniforme and be sure there aren't any shadows. We were about recording the video again, in order to improve it and be able to edit it. Inexperienced young people issues! 
Finally, we found a solution to eliminate all the green color in the video and mantained red and blue. This worked because it eliminated all the green background and also the green in our faces. Although the faces were rather red, after all the inconvenients we had to deal with, this was the least of our problems. 
Then, with the video finished, we used iMovie to add music and some effects easily.
However, despite it was difficult to edit the video, we had a great time recording it and it was a really good group experience. 
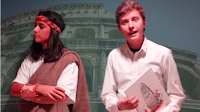
Here you have our video in which we explain a new challenge to our children. They will have to create a comic about a history period of time. So, please don't laugh at our red faces!  


Here you have the link to the video:


* We have included the Bloopers and Outtakes just for fun, but maybe for children we will leave it without them.


Hope you liked it and had fun!


See you soon!